Project submitted as part of Udacity Self Driving Car Nanodegree.
Refer this link for source code files in Github.
Behavioral Cloning Project
The goals / steps of this project are the following:
- Use the simulator to collect data of good driving behavior
- Build, a convolution neural network in Keras that predicts steering angles from images
- Train and validate the model with a training and validation set
- Test that the model successfully drives around track one without leaving the road
- Summarize the results with a written report
Rubric Points
As part of the project submission, I will consider the rubric points individually and describe how I addressed each point in my implementation.
Files Submitted & Code Quality
1. Files included in the submission.
My project includes the following files:
- zerosteer.ipynb containg the script to reduce the the zero-angle count (details below)
- model.py containing the documented script to create and train the model
- drive.py for driving the car in autonomous mode (from Udacity)
- model.h5 trained convolution neural network
- video.py to generate the output video from images (from Udacity)
- video.mp4 Outout Video captured of the autonomous driving of the car
- writeup_report.md summarizing the results (this document, changed to ReadMe.md)
2. Steps to RUN the code
Using the Udacity provided simulator and my drive.py file, the car can be driven autonomously around the track by executing
- Using zerosteer.ipynb - Random delete zero-angle image files locally before uploading to Udacity platform.
python model.py # to build the model
python drive.py model.h5 <output_folder> # optional folder for output
python video.py output_folder # to create video from folder with images
3. Submission code details
Using zerosteer.ipynb - Randomly selected 75% of images with steering angle close to zero (within -0.05 & 0.05) and deleted the files locally before uploading to Udacity platform.
Once the data is uploaded to the Udacity platform, the model.py file contains the code for training and saving the convolution neural network. The file shows the pipeline I used for training and validating the model, and it contains comments to explain how the code works.
Apart from that, drive.py and video.py are included. These code files are provided by Udacity to help us in driving the car in autonmous mode and generating video of the session.
Model Architecture and Training Strategy
1. Selection of appropriate model architecture
I started off with the standard LeNet Architecture which includes the initial two sets of convolutional, activation, and pooling layers and then a Flatten followed by 2 fully connected layers and final prediction layer. Since we are trying to predict the steering angle, output layer is a single regression value instead of a softmax layer.
The model includes RELU layers to introduce nonlinearity, and the data is normalized in the model using a Keras lambda layer and the images are also cropped to the required area. Code snippet below:
model.add(Lambda(lambda x: x / 255.0 - 0.5, input_shape=(160,320,3)))
# Cropping off the TOP 70rows and BOTTOM 25rows.
model.add(Cropping2D(cropping=((70,25),(0,0))))
model.add(Convolution2D(6, (5, 5), activation="relu"))
model.add(MaxPooling2D())
model.add(Convolution2D(6, (5, 5), activation="relu"))
model.add(MaxPooling2D())
model.add(Flatten())
model.add(Dense(120))
model.add(Dense(84))
model.add(Dense(1)) # Final prediction of the steering angle.
Although this model architecture was giving decent results, I tried the nvidia E2E model. This is a much more taller architecture with many more layers, but far less parameters to tune. The architecture is as follows: Initial Normalization and Cropping layers, followed by five Conv2D layers with RELU activation and Dropouts, followed by a Flatten layer and then four fully connected layers. Code snippet below:
model = Sequential()

# Preprocess incoming data, centered around zero with small standard deviation
model.add(Lambda(lambda x: (x / 255.0) - 0.5, input_shape=(160,320,3)))
model.add(Cropping2D(((70, 25), (0, 0))))

#1st layer - Conv2D, no of filters- 24, filter size= 5x5, stride= 2x2
model.add(Convolution2D(24, 5, 5, activation='relu', subsample=(2, 2)))
model.add(Dropout(0.1))
#2nd layer - Conv2D, no of filters- 36, filter size= 5x5, stride= 2x2
model.add(Convolution2D(36, 5, 5, activation='relu', subsample=(2, 2)))
model.add(Dropout(0.2))
#3rd layer - Conv2D, no of filters- 48, filter size= 5x5, stride= 2x2
model.add(Convolution2D(48, 5, 5, activation='relu', subsample=(2, 2)))
model.add(Dropout(0.1))
#4th layer - Conv2D, no of filters- 64, filter size= 3x3, stride= 1x1
model.add(Convolution2D(64, 3, 3, activation='relu'))
model.add(Dropout(0.2))
#5th layer - Conv2D, no of filters- 64, filter size= 3x3, stride= 1x1
model.add(Convolution2D(64, 3, 3, activation='relu'))
model.add(Dropout(0.1))

#flatten
model.add(Flatten())

#6th layer - fully connected layer
model.add(Dense(100, activation='relu'))
model.add(Dropout(0.3))
#7th layer - fully connected layer
model.add(Dense(50, activation='relu'))
model.add(Dropout(0.3))
#8th layer - fully connected layer
model.add(Dense(10, activation='relu'))
#9th layer - fully connected layer
model.add(Dense(1)) # Final prediction of the steering angle.
2. Attempts to reduce overfitting in the model
The model was trained and validated on augmented data sets to ensure that the model was not overfitting. Also Dropout layers were introduced in the model to prevent overfitting.
The model was tested by running it through the simulator and ensuring that the vehicle could stay on the track. Two loops of the track was completed successfully.
3. Model parameter tuning
The model used an adam optimizer, so the learning rate was not tuned manually.
4. Appropriate training data
Training data was chosen to keep the vehicle driving on the road. I used a combination of center lane driving and other filtering/augmentation while collecting the training data/images.
For details about how I created the training data, see the next section.
Model Architecture and Training Strategy
1. Solution Design Approach
The overall strategy for deriving a model architecture was to use established and well known architectures as discussed in the class.
My first step was to use a convolution neural network model similar based on the LeNet architecture. I thought this model might be appropriate because of the good experience from my previous project using it for Image identification.
Although this model architecture was giving decent results, I tried the nvidia E2E model. This is a much more taller architecture with many more layers, but far less parameters to tune (details mentioned in above section).
Other design considerations
- The dataset was split into train/validation data in 80:20 ration so as to validate the performance of the model.
- Filtering out of near zero-angle data helped to reduce the imbalance in the raw data.
- Image Normalization and Cropping added to the quality of the input data and eased training process.
- Data Augmentation (described in below section) in addition to Dropout layers were used to minimize fitting issues.
- Generator function was used due to the large number of images and possible memory problems.
The final step was to run the simulator to see how well the car was driving around track one. The final model was able to steer the car through the road without touching the lanes.
2. Final Model Architecture
The final model architecture is based out of the nvidia E2E architecture(code snippet above) consisted of a convolution neural network with the following layers and layer sizes.
| Model layers |
|---|
| Lambda layer ( Normalization, 160x320x3) |
| Cropping2D layer (remove top 70 & bottom 25) |
| Conv2D layer 1 (24 filter depth, 5x5 kernel, 2x2 stride, 43x158x24) + RELU + Dropout 10% |
| Conv2D layer 2 (36 filters depth, 5x5 kernel, 2x2 stride, 20x77x36) + RELU + Dropout 20% |
| Conv2D layer 3 (48 filters depth, 5x5 kernel, 2x2 stride, 8x37x48) + RELU + Dropout 10% |
| Conv2D layer 4 (64 filters depth, 3x3 kernel, 1x1 stride, 6x35x64) + RELU + Dropout 20% |
| Conv2D layer 5 (64 filters depth, 3x3 kernel, 1x1 stride, 4x33x64) + RELU + Dropout 10% |
| Flattening layer (4x33x65 -> 8448) |
| Dense layer 1 (100 output units) + RELU + Dropout 30% |
| Dense layer 2 (50 output units) + RELU + Dropout 30% |
| Dense layer 3 (10 output units) + RELU |
| Dense layer 4 (1 output unit) [Steering output prediction] |
3. Creation of the Training Set & Training Process
Here are the steps followed to capture a good training dataset.
- Two laps of anti-clockwise center lane driving followed by one lap of clockwise driving.
- This created a dataset with 10398 images (including center, left & right camera images).
| Left | Center | Right |
|---|---|---|
 |
 |
 |
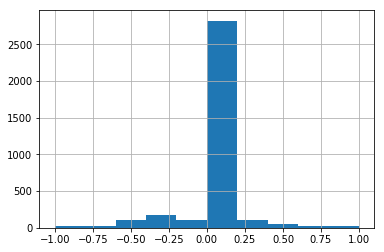
- Identified nearly 8163 images with steering angle less than 0.05 from zero. This is highly imbalanced dataset.

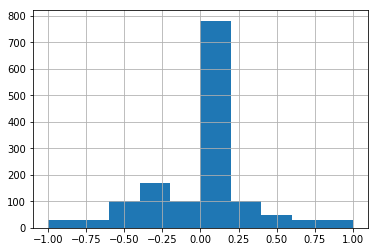
- Removed 75% (6120) of these images randomly which resulted in 4278 images for uploading. This dataset looks slightly better balanced.

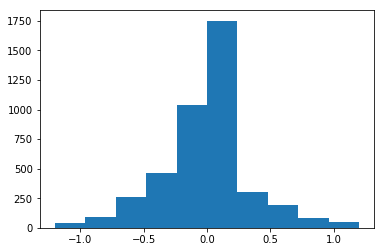
- Adjusted the steering angle of the left & right camera images. No change in count.

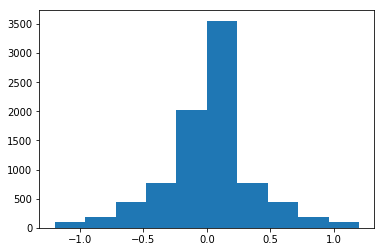
- Augmented the images by flipping horizontally resulting in 8556 images for final training.

There was no recording done for the vehicle recovering from the left side and right sides of the road back to center.
Dataset was randomly shuffled and 80% for training 20% of the data for validation set. The model was trained on the training dataset and the validation set helped determine if the model was over or under fitting. The number of epochs was 5 and it resulted in good numbers. I used adam optimizer so that manually training the learning rate wasn’t necessary.
Simulation
The car was able to drive through the test track in the autonomous mode without going over the lane lines and keeping to the center of the road most of the time. It was tested for two laps and completed the same successfully. Please find link to the video output.